ボタンをクリックするごとに色を変える
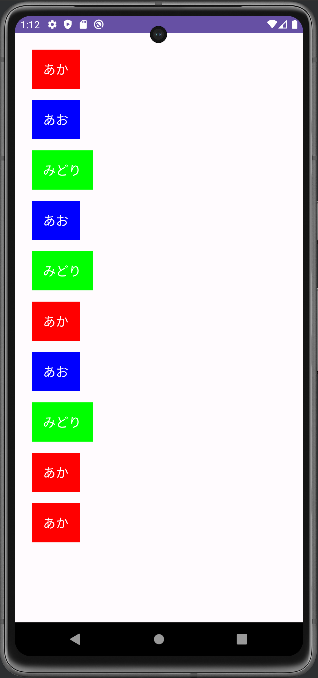
今回はポンコツ2人組がJetpack composeでボタンをクリックするごとに色を変えるサンプルプログラムに挑戦してみました! ボタンをクリックするごとにボタンの色が赤→青→緑→赤・・・と変化し、同時にボタンのテキストも"あか"→"あお"→"みどり"→"あか"・・・と変化させています。 また、Composeのデフォルトテーマの影響を受けないカスタムボタンを作成しています。
※この記事は2024/05/20時点の情報です。
MainActivity.kt
■データクラスの定義
ButtonStateデータクラスを定義し、colorIndexプロパティを持たせます。初期値は0にしています。
■状態管理
rememberを利用してbuttonStatesリストで10件の要素(ButtonStateデータクラス)を状態管理します。
■カスタムボタン
Jetpack Composeでは、デフォルトのテーマが適用されているため、カスタムのスタイルを適用するためにカスタムボタンを作成しています。
package com.example.btnclick

import android.os.Bundle
import androidx.activity.ComponentActivity
import androidx.activity.compose.setContent
import androidx.compose.foundation.background
import androidx.compose.foundation.clickable
import androidx.compose.foundation.layout.Column
import androidx.compose.foundation.layout.fillMaxSize
import androidx.compose.foundation.layout.padding
import androidx.compose.material3.Button
import androidx.compose.material3.MaterialTheme
import androidx.compose.material3.Surface
import androidx.compose.material3.Text
import androidx.compose.runtime.Composable
import androidx.compose.runtime.getValue
import androidx.compose.runtime.mutableStateOf
import androidx.compose.runtime.remember
import androidx.compose.runtime.setValue
import androidx.compose.ui.Modifier
import androidx.compose.ui.graphics.Color
import androidx.compose.ui.semantics.Role.Companion.Button
import androidx.compose.ui.tooling.preview.Preview
import androidx.compose.ui.unit.dp
import androidx.compose.ui.unit.sp
import com.example.btnclick.ui.theme.BtnClickTheme

class MainActivity : ComponentActivity() {
    override fun onCreate(savedInstanceState: Bundle?) {
        super.onCreate(savedInstanceState)
        setContent {
            BtnClickTheme {
                // A surface container using the 'background' color from the theme
                Surface(
                    modifier = Modifier.fillMaxSize(),
                    color = MaterialTheme.colorScheme.background
                ) {
                    ColorChangingButtons()
                }
            }
        }
    }
}

data class ButtonState(
    var colorIndex: Int = 0
)

@Composable
fun ColorChangingButtons() {
    val colors = listOf(Color.Red, Color.Blue, Color.Green)
    val texts = listOf("あか", "あお", "みどり")
    var buttonStates by remember { mutableStateOf(List(10) { ButtonState() }) }  // 10個のボタン

    Column(modifier = Modifier.padding(16.dp)) {
        buttonStates.forEachIndexed { index, state ->
            CustomButton(
                text = texts[state.colorIndex],
                backgroundColor = colors[state.colorIndex],
                onClick = {
                    buttonStates = buttonStates.toMutableList().apply {
                        this[index] = this[index].copy(colorIndex = (this[index].colorIndex + 1) % colors.size)
                    }
                },
                modifier = Modifier.padding(8.dp)
            )
        }
    }
}

@Composable
fun CustomButton(text: String, backgroundColor: Color, onClick: () -> Unit, modifier: Modifier = Modifier) {
    Column(
        modifier = modifier
            .background(backgroundColor)
            .clickable { onClick() }
            .padding(16.dp)
    ) {
        Text(
            text = text,
            fontSize = 18.sp,
            color = Color.White
        )
    }
}
処理結果は次の通りです。
状態管理を上手く利用するのがポイントかと思います。また、デフォルトのテーマが適用されて
スタイルの設定が上手くいかない時などはカスタム部品を作成することを検討してみてください。
さて、ポンコツ2人組は今回のサンプルプログラムを理解できたのでしょうか?

時間がある人は、ボタンだけではなく、いろいろな部品に挑戦してJetpack composeに慣れていきましょう!